Organizing your home isn’t just about tidying up—it’s about creating a space that supports the life you want to live. A well-organized home gives you the freedom to focus on what truly matters, without the constant mental clutter of misplaced items or chaotic spaces. When everything has its place, life flows more effortlessly, and your home becomes a sanctuary of peace and productivity.
I’ve seen firsthand how transformative this process can be. Some projects require teams of people working tirelessly for days to complete—but the reward is always worth it.
Before diving into organizing, it’s important to take a step back and create a plan. Having a clear vision of how you want your home to function and flow will help you stay motivated—even when the task feels overwhelming.
Some homes I’ve worked on have taken teams of four people working 8–10 hours a day for multiple days to complete, so don’t feel discouraged if it takes time. Start with a plan and move at your own pace.
Here are some tips to help you organize your entire home.
1. Think Big Picture
Before tackling a single drawer, step back and envision how your entire space should flow. Every category in your home needs a dedicated “home.” Chaos often arises when categories overlap or items stray from their designated spaces. Picture your home as a thoughtfully organized store—each category has its own space, clearly defined and easy to access. By setting this foundation, you’ll create a system that’s simple to maintain and eliminates the guesswork of where things belong.
With every pure home project, I like to create a blueprint of the house. I roughly sketch a room and visually plan a space for each category that will be in that specific room.
2. List Your Categories
Start by identifying the main categories in your home—these will vary depending on your lifestyle and priorities. For example, some households may need extra space for arts and crafts, while others might prioritize sentimental keepsakes or seasonal storage. By understanding your unique needs, you can create a system that feels intuitive and functional. Below is a list of common categories with tips to help you organize them effectively.
3. Macro Organize first then Micro
Start with macro organization to create a strong foundation before tackling the details. If you try to micro-sort every little piece or category too early, you may find yourself overwhelmed and stuck. Macro organization means grouping items into broad categories (e.g., placing all utilitarian items in one tub) and moving them to their designated area, such as a closet or specific room. Macro organizations also involve rearranging furniture or shelving height as needed to make space for these categories.
For smaller items scattered across different categories—like those found in a junk drawer—use a basket to gather them temporarily. This allows you to walk through your home later with the basket and easily return each item to its proper place.
Once your macro organization is complete, decide how detailed you want to get. Macro organization groups items broadly, while micro organization organizes them into subcategories (e.g., ornaments, lights, and gift wrap in separate containers).
Opt for a level of detail that aligns with your space and lifestyle, ensuring your system is both functional and sustainable.
4. Pick the right container
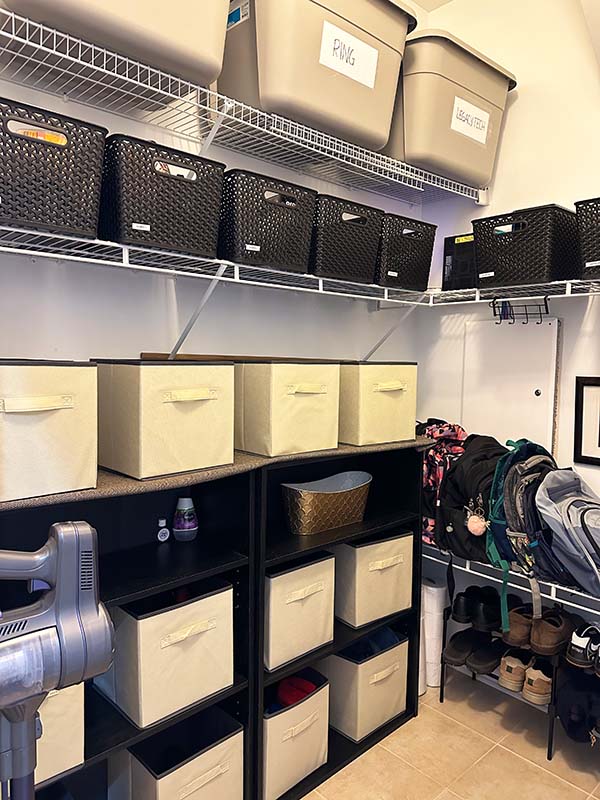
Choosing the right container is essential for creating an organized system that’s both functional and adaptable. Select containers based on the amount of space each category requires, while leaving room for transitions and growth. The right container not only keeps you organized but also makes your system easier to maintain over time.
- If you prefer a toss-and-grab approach: Avoid small bins or separators. Instead, opt for large drawers or bins where similar categories can be grouped together and easily rummaged through.
- Medium Sized Bins or Baskets: Perfect for frequently used items. Open containers without lids make grabbing and putting items back effortless.
- Tubs with Lids:
- Small Shoeboxes: Ideal for micro-organizing small items like tools or arts and crafts supplies.
- Medium Clear Tubs: Great for hobby supplies (especially ones you travel with), tech accessories, cords, and similar items. Bags may seem convenient for travel, but they’re temporary and difficult to store neatly when brought home. Tubs are stackable, symmetrical, and keep everything in order.
- Large Solid-Color Tubs: Best for deep storage of seasonal or infrequently used items.
I rely on a combination of these containers in every project because they’re visually appealing, symmetrical, stackable, and cost-effective. If your home feels cluttered, it’s often because rarely used items are mixed with everyday essentials. By using like-shaped containers, such as rectangular tubs, you create visual symmetry—much like stacking in a game of Tetris. This reduces clutter and brings a sense of peace and order to your space.
5. Label
With the right containers and a clear labeling system, even the most chaotic spaces can become calm and orderly. Labeling can help streamline the look and allows for easy recognition.
- Use big, bold labels so you know exactly what’s inside without needing to see the contents.
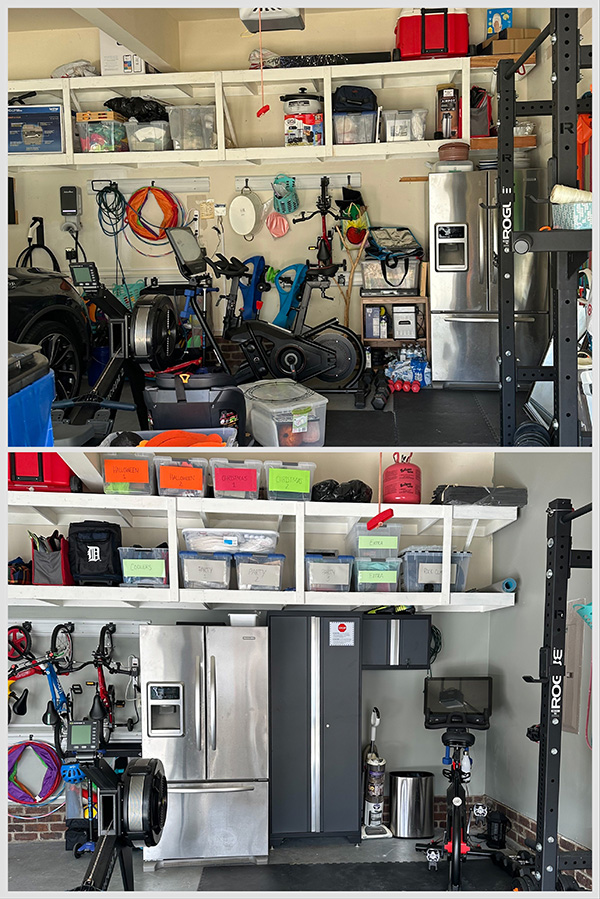
- If you have a bunch of mismatched tubs, you can create visual simplicity with labels.All you need is cardstock and a sharpie to make big letters, then secure the paper with clear packing tape. It’ll take about 6 rows of packing tape to make it look and feel like it's laminated. It’s also super easy to take off and replace without leaving residue.
6. Start With High-Use Areas
Focus on the spaces you use most often—like the kitchen, master bedroom, and living areas—before tackling less frequented areas. These rooms, along with the garage, are typically the largest projects. Getting them done first will make the rest of your organizing process feel less overwhelming. Plus, completing these key spaces early will make daily life more manageable as you move on to smaller tasks, like closets and storage areas.
7. Take everything out
This might be one of the most important steps. When I worked in retail, rearranging shelf displays always started with a plan. We printed the blueprints, removed everything from the shelves into boxes, cleaned the area, adjusted the shelving to fit the new layout, and restocked according to the plan.
At home, the same principle applies. Resist the urge to dive into one drawer without a clear plan or clear space to put things back. Start by emptying the entire area, creating a clean slate that allows for big-picture thinking and flexibility. Use this opportunity to clean the space and make space for change. Even if it’s not perfectly organized, the fact that the entire space was cleaned will feel worth it.
Common Categories and How to Organize Them
Below are the categories I find in most homes, with examples of how to efficiently and visually organize them.
1. Utilitarian
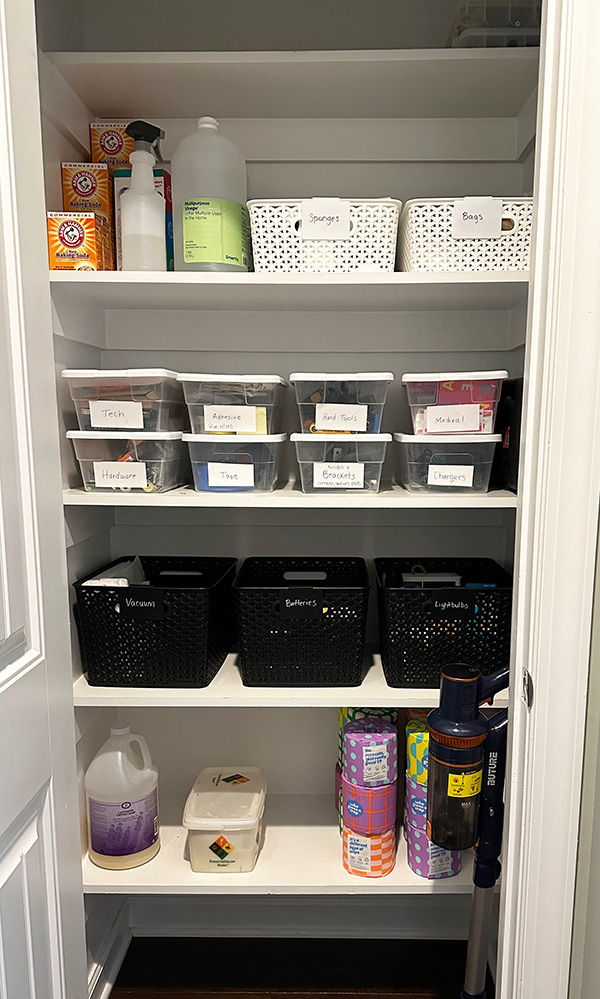
Lightbulbs, batteries, manuals, hardware, chargers, tech, medical, and inside tools.
- Tubs: Store lesser used items in separate clear, small to medium-sized tubs. Label each tub for easy access and keep everything visible.
- Open bins or baskets: For more frequently used items like batteries and lightbulbs, use baskets so you can easily grab and go.
2. Linens
Sheets, blankets, and towels.
Rethink your linen closet. Instead of an overflowing hallway closet, disperse sheets to dresser drawers in each bedroom. Keep one or two sets per bed, and store heavy blankets in bedroom closets based on the season.
- Sheets: Store in dresser drawers in the bedroom they belong to. Two sets per bed are plenty.
- Blankets: Keep big, seasonal blankets in bedroom closets.
- Towels: Keep everyday towels folded and hung in bathrooms for easy access. Extra towels can be folded and stored in the bathroom or master room closet, or folded in the hallway linen closet, especially if the sheets and blankets have been dispersed to the rooms.
3. Kids’ Clothes
Current clothes, clothes to grow into, clothes for gifting or donation.
Kids' clothes are in constant transition of sizes and seasons. Start by organizing kids’ clothing into the three top main categories:
- Current Clothes: Everyday items in easy-to-reach drawers or bins.
- Clothes to Grow Into: Store in their closet for future use.
- Clothes for Gifting or Donation: Use a family donation box or store them in the recipient's closet.
If you want to micro your kids clothing even further you can use the categories from the "Master Closet”.
4. Master Closet
Hidden, foldable and hanging.
To keep it simple, divide your clothing into:
- Hidden in Drawers and/or Bins: comfy clothes; leggings, t-shirts, pjs, undies & socks.
- Foldable on Open Shelves: jeans, shorts, sweaters, casual shirts & pants.
- Hanging in Closet: Use hangers for nice clothes like blouses, dresses, suits, blazers & larger sweaters or clothing that doesn't fold well.

5. Home Goods
Lamps, picture frames, curtains, and other decor items.
Where: Attic or garage for rarely used items. A dedicated home goods closet for frequently swapped décor.
- Large tubs: For deep storage, grouping linens, or seasonal decor.
- Shelves, baskets, or drawers: For items you change out regularly like flowers or vases.
6. Cleaning Supplies
Kitchen sink, bathroom sink, linen closet, laundry room and utility closet.
Streamline your cleaning routine by storing supplies where they’re used most.
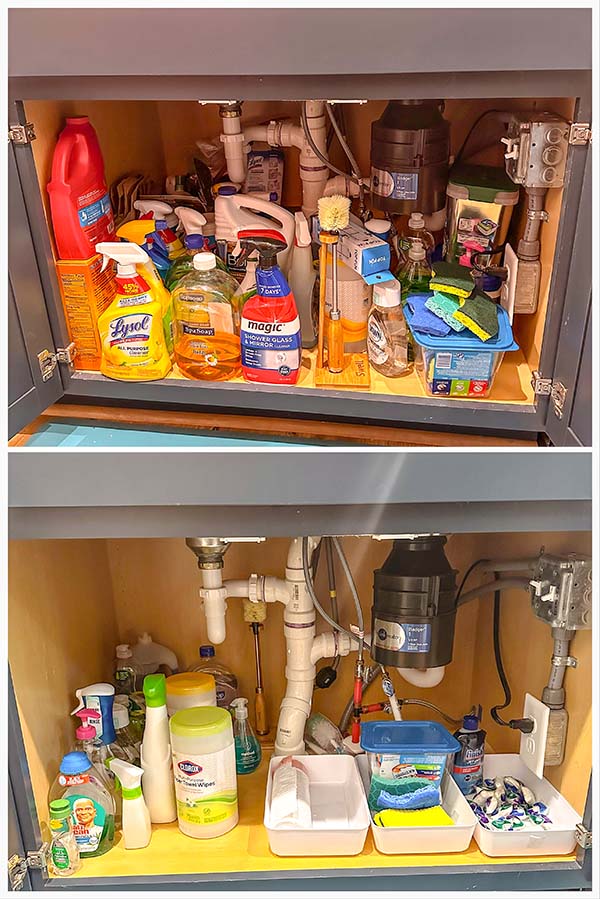
- Under Kitchen Sink: Avoid overcrowding under the kitchen sink by limiting it to essentials; sponges, dish soap, counter cleaners and garbage bags.
- Under Bathroom Sinks: Bathroom/shower/toilet cleaning supplies on one side, extra self care supplies (if you don’t have room in your linen closet).
- Laundry Room: laundry room cleaning supplies, and extra or specialized cleaning supplies.*
- Utility Closet: *If you don’t store extra or specialized cleaning supplies in the laundry room, store in the utility closet or a separate cleaning supply closet.
7. Tech
Legacy tech, current tech, and cables & chargers.
Where: In office closet, or desk, or in the utilitarian closet.
- Legacy Tech: Old devices stored in deep storage tubs.
- Current Tech: Gadgets you use daily in baskets for easy grab and go.
- Cables and Chargers: Keep neatly coiled and stored in medium sized baskets or tubs depending on how often you use them. (you can further micro this category by having extra or legacy cables in a small to medium sized utility tub and current cables in easy grab and go baskets.
8. Office Supplies
Paper, stationery, writing utensils, printer, and tech.
- Desk drawer organizers: One drawer can be used for scissors, highlighters, paperclips, usb drives, post its, and staples. If you don’t have a book shelf you can also use drawers for notebooks, files, current tech and any other frequently used items.
- Decorative buckets: For smaller, frequently used items on your desk like pens and pencils.
- Baskets: If you don’t have drawers you can use baskets on a shelf for stationary, printer ink, and tech.
- Bookshelves: For books, old notebooks, photo albums, and baskets. I am in love with putting bookshelves and/or two stacked tubs in an office closet with just a hnaging rod and upper shelf to maximize space.
- Tubs: For legacy tech, old notebooks
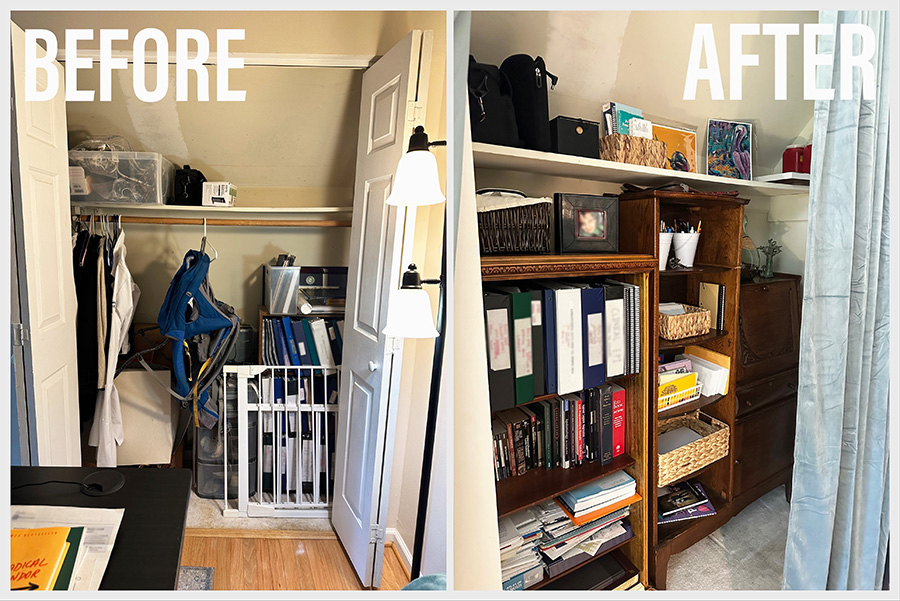
9. Sentimental Items
Photos, trinkets, trophies, and keepsakes.
Where: Closets, deep storage, or display shelves (for a select few).
Give sentimental items a dedicated space that honors their value without creating clutter.
- Small Items: Photos and trinkets in small storage boxes, sorted by person or year.
- Larger Items: Trophies, toys, or other keepsakes in labeled tubs stored out of sight.
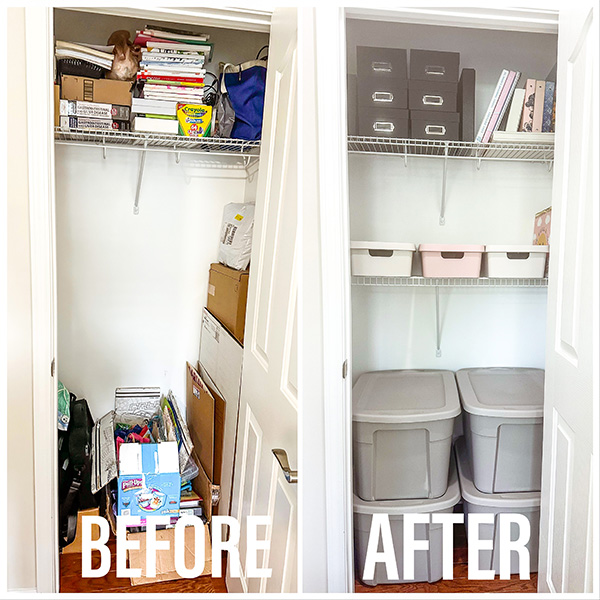
10. Gifting Supplies
Gift wrap, bags, ribbons, and bows.
Where: Closet shelves with baskets, or a large tubs for each holiday.
- A tub for each holiday: For smaller collections, a tub each for Easter, Halloween, Christmas, and birthday supplies.
- Shelves or drawers with smaller baskets and tubs: For larger collections, divided into micro categories like a separate basket for bows, balloons, thank you cards, etc.
11. Incoming and Outgoing Spaces
Mail, donations, gifting, to-sell, returns, and incoming packages.
Where: mudroom, entryway, garage, office, formal dining room or guest room.
- Incoming Items: An empty spot for packages, mail or things that need to be brought in and put away.
- Outgoing Items: Have a designated box for donations, returns, or items to be sold or gifted.
12. Kitchen
Pantry staples, seasonings, baking supplies & ingredients, snacks, tools, and cookware.
The kitchen is the heart of the home but can quickly turn into a cluttered chaos zone. A simple rule to stay organized: if it’s not a kitchen item, it doesn’t belong here. Assigning clear spaces for food, tools, and appliances helps maintain order and keeps everything within easy reach.
- Food Categories:
With so many micro-categories of food in a kitchen, visual overwhelm can easily set in, especially if you use a pantry for all food. To avoid this, assign cupboards & drawers for each type of food category, right by your prep area. Some of these categories can share a cupboard but be divided into specific sides (e.g., one side for spices, another for oils).
- Spices and Seasonings
- Oils, Vinegars, and Dressings
- Baking Essentials: Flours, sugars, frosting, and other ingredients.
- Snacks: Chips, cereals, and grab-and-go items.
- Canned and Jarred Foods
- Noodles and Rice
- Grains, Nuts, Seeds, and Bulk Goods
- Breakfast; oatmeal, bars, cereal, etc.
- Everyday Tools:
Keep everyday tools like measuring cups, cookware, and utensils near their point of use to minimize unessecary steps and time. For example:
- Baking tools like measuring cups and mixing bowls near the baking supplies.
- Pots and pans close to the stove.
- Utensils in accessible drawers by prep areas.
- Dishes and cups by the dishwasher for easy unloading.
- Pantry: Reserve for lesser-used items.
- Lesser-used appliances.
- Seasonal cookware.
- Bulk storage of items not used daily.
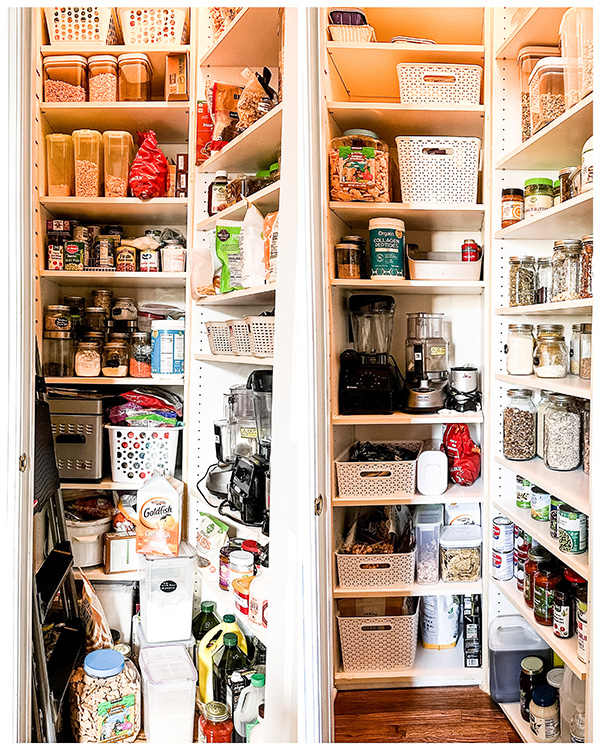
Of course if you have a large kitchen pantry convenient to your prep station, storing food items in the pantry can make more sense. For this pantry, we took out the categories, oils, vinegars & dressings, noodles & rice and baking. We gave them their own cupboards near the stove and oven. We kept breakfast, snacks, bulk foods (nuts, seeds, grains, dried fruit), most-used appliances and lesser used party supplies at the very top.
13. Garage
Sports gear, outside toys, tools, auto supplies, and deep storage for various categories.
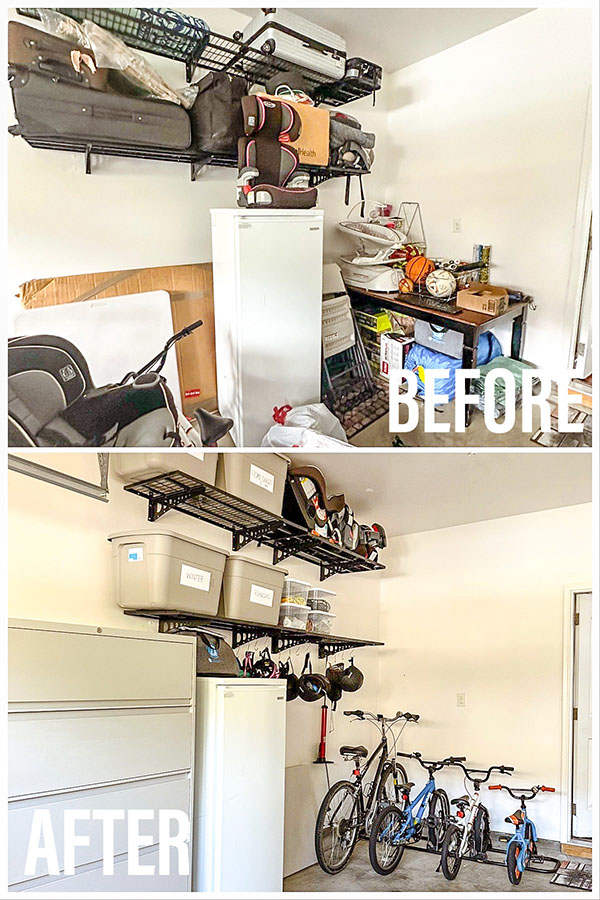
I wrote an entire post on how to organize your garage with a lot of helpful tips.
- Shelves: For large tubs. For example, a tub for rock climbing gear or beach toys for easy car travel. Or deep storage home goods, sentimental, or holiday.
- Filing cabinets: Provides cheap asthetically pleasing hidden storage for categories like; auto supplies (sponges, special cleaners, brushes, waxes, etc.) A drawer for toys (bubbles, chalk, fairy garden etc.) The top shelf on a 5 drawer filing cabinet is usually a hidden pull out shelf perfect for drills and power tools.
14. Hobbies
Craft supplies, sports equipment, and seasonal activities.
Where: Closets, dedicated hobby rooms, offices, garages, or even unused spaces like a basement kitchen can become the perfect hobby hub.
Hobbies add joy and creativity to life, but their supplies can take over if not properly organized. Active hobbies need accessible storage, while infrequent or seasonal hobbies can be tucked away for later use.
- Shelves, cabinets, bookshelves, or drawers: Ideal for active hobbies, making supplies easy to grab and return.
- Deep storage tubs: Best for infrequent hobbies or large groupings of materials, like seasonal sports gear or knitting yarn.
15. Toys
Building, educational, costumes, and games.
Where: Playroom, living room, closet, or bedrooms.
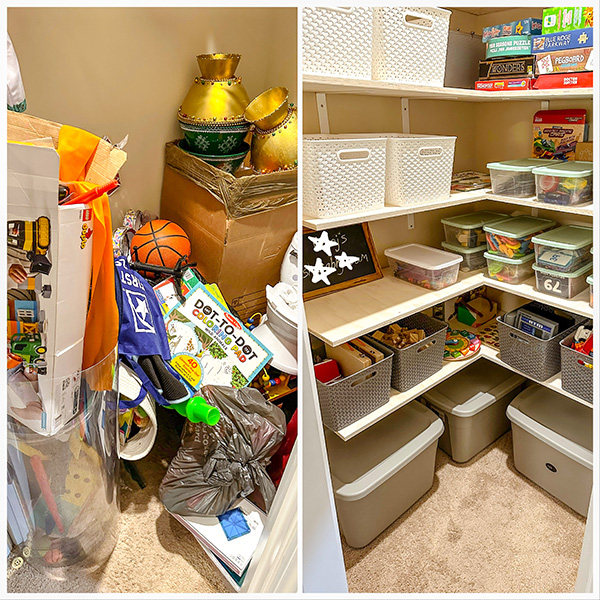
- Building: Use large decorative sturdy baskets for each building material (magna tiles, lincoln logs, blocks, legos, etc.) so it’s easy for the kids to rummage through and toss back in.
- Educational & Games: Normally they come in a nice stackable box, but if boxes are constantly destroyed or not easy to put back in, use clear shoe boxes or medium sized tubs to keep everything visable and stackable. I also like to use these tubs for grouping together multiple card games or small musical instruments.
- Costumes: Stuff everything into a drawer or a tub or hang up neatly. The first two your child can easily manage, hanging up is the hardest option that will probably end up an adult's responsibility.
- All the other toys: In the first macro phase every other toy can be thrown together in a large toy box or tub. After the macro you can start to micro organize, like action figures in one shoe box or basket, toy cars in another and any other category of toys that can be grouped together.
Organizing your home is a marathon, not a sprint. Start with a clear vision, tackle one category at a time, and build a system that works for your lifestyle. If you ever feel stuck or overwhelmed, remember you don’t have to do it alone, we can help!
What’s the first space you’re tackling? Share your plans or ask questions in the comments below!


